


Help center
Fine tune page (Personal, Professional, Immersive)
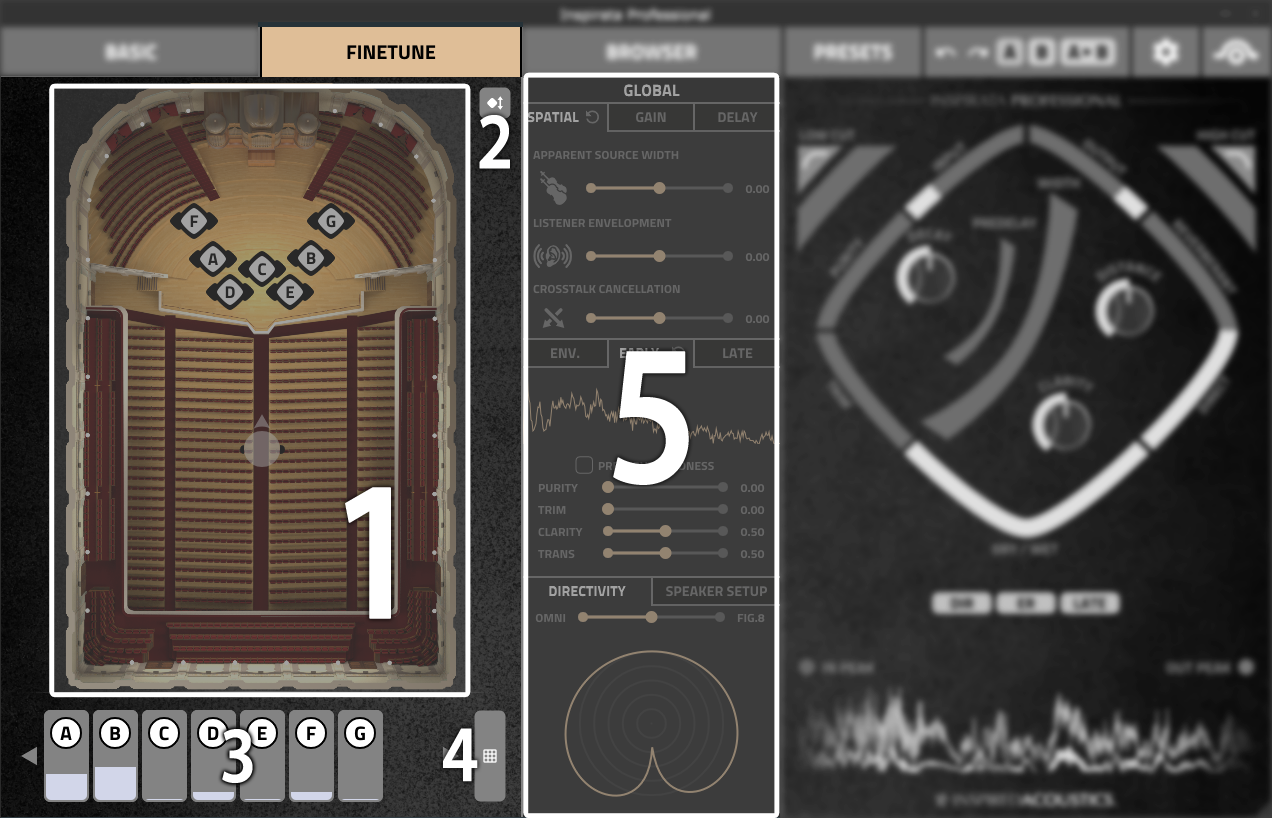
1 Source, receiver positions
On the left side of the FINETUNE tab, you can see a top-view representation of the selected room. Using this segment of the GUI, the positions of the virtual sound sources and the position of the listener can be changed. The white rectangles marked with letters represent the sound sources (e.g. A and B for a stereo sound source) within the space and the white circle with a triangle and black dots on opposite ends represents the listening position. You can move any source or listener position by clicking and dragging its icon. Some rooms may have spatial limits in positioning sources and receivers (e.g. you can move sound sources on the stage and you can move the listener over the audience area) and some rooms don’t have these spatial limits.
2 Source Display Size
Use this button to toggle the display size of the sound source from large to small. This feature can be useful if you are setting up a more precise sound source location setup at rooms with smaller stages.
3 Source Volume Meter
On this tab, each sound source has its own volume level meter. The top part indicates the sound source label corresponding to the Map.
4 Routing*
*Available in the Professional and Immersive Editions.
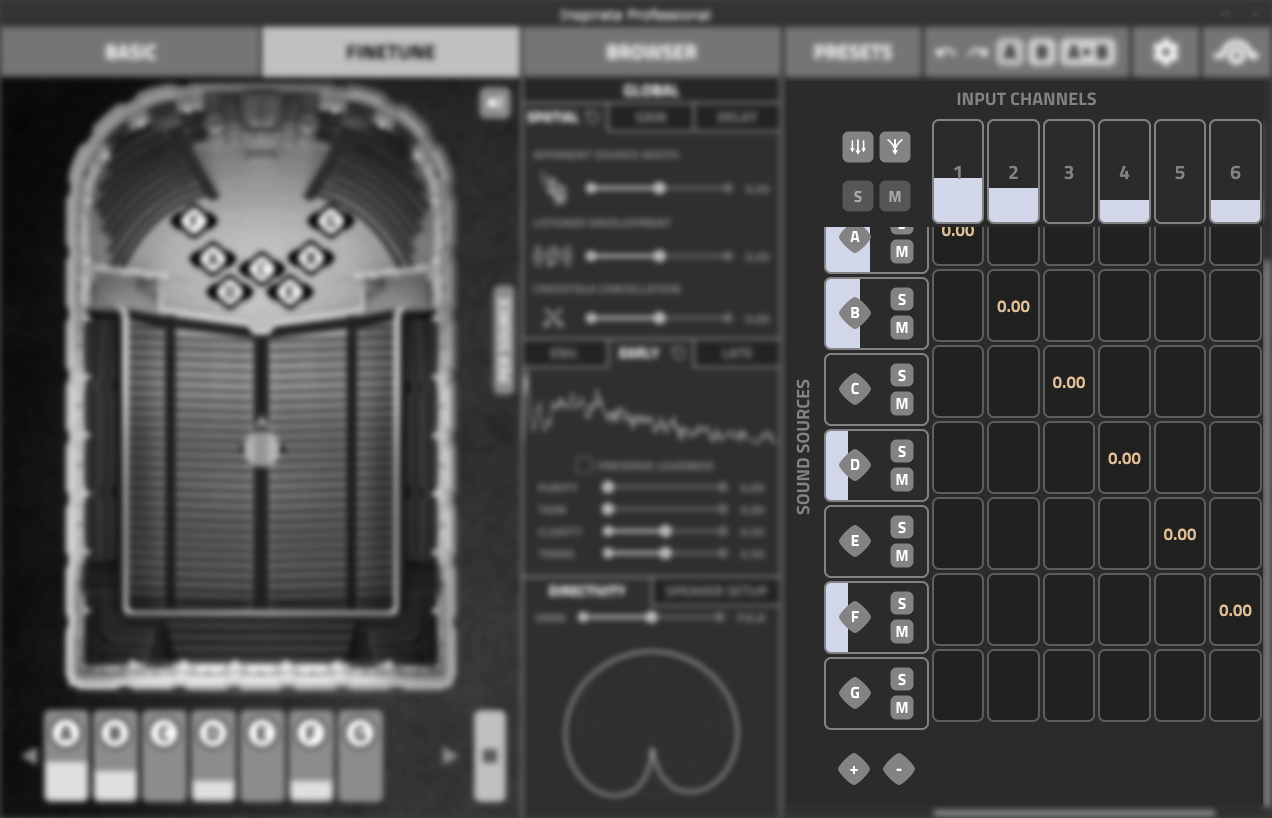
The Routing button opens a window with a routing matrix displayed. This is a typical routing matrix where you can assign plugin inputs to specified sound sources on the map, with adjustable gain. Double-clicking on any of the elements in the matrix will enable or disable the corresponding routing. Blank elements mean no sound between that input and the source position. You can change the gain values by clicking and dragging on a given number.
Hint: You can use this routing matrix to imagine the sound flowing into the plugin on the top and traveling and arriving through the slots enabled with a numeric value and arriving to the left as a source position on the map. For example, input channel 3 on the image above goes to source C on the map with 0.00 dB gain, so without attenuation or additional gain applied.
5 Global / Per source controls*
*Per source controls are available in the Professional and Immersive Editions.
Spatial controls panel
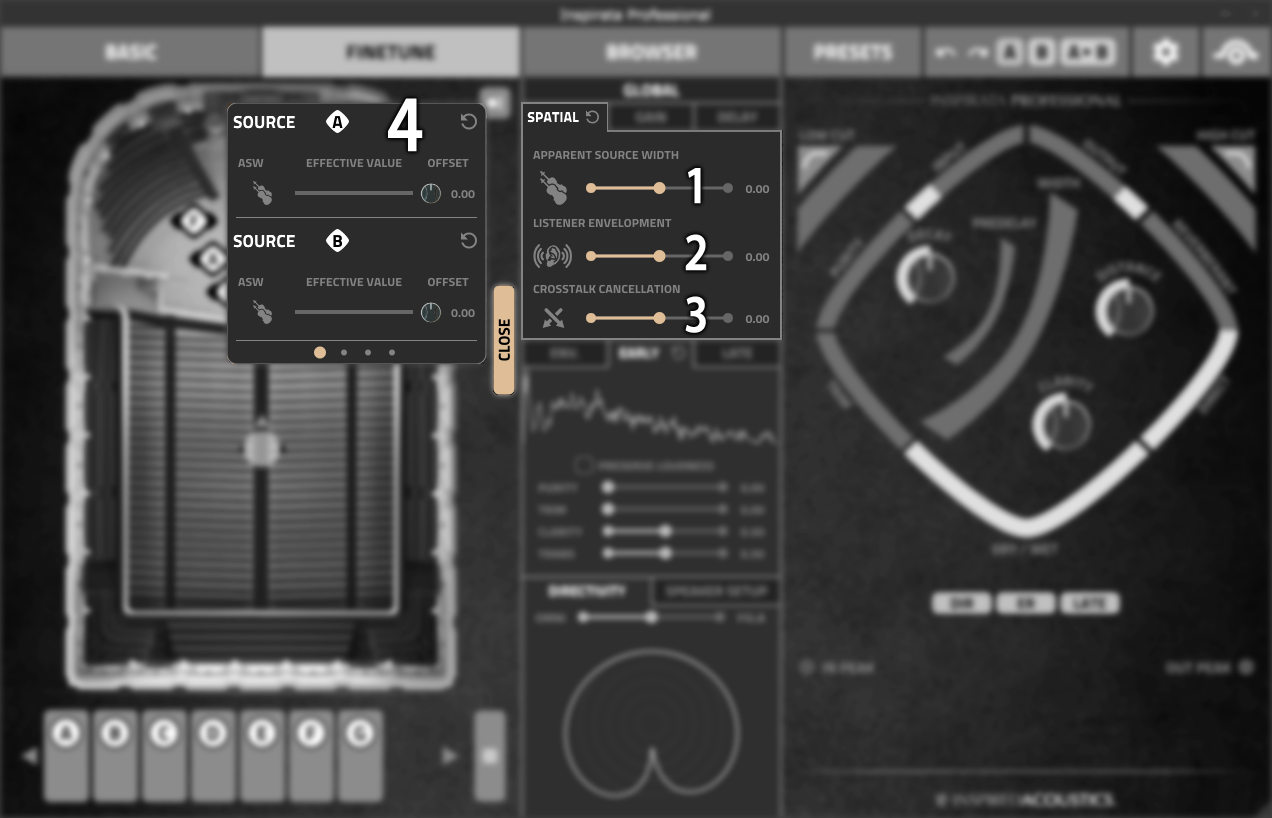
1 Apparent Source Width (ASW)
You can adjust the width of the sound source with this slider. Increasing ASW will gradually widen the sound source which represents a sound source that is not punctual but has significant spatial extent (e.g. a grand piano, a whole string section or a choir). Increasing ASW will naturally result in a wider stereo image and a greater sense of space.
2 Listener Envelopment (LEV)
With this slider, you can adjust how much the sound envelopes the listener’s ears. Increasing the value of LEV will gradually place the “ears” of the listener or the virtual microphones farther and farther away from each other. This represents the use of a wider stereo pair of microphones in the room and results in a wider stereo image and a greater spatial experience.
3 Crosstalk cancellation
Crosstalk cancellation controls the blending of sound coming from different directions in space. Increasing crosstalk cancellation will result in more diverse sound waves arriving to the listener’s “ears” or to the stereo pair of virtual microphones in the room, meaning a wider stereo image.
4 Spatial controls per source
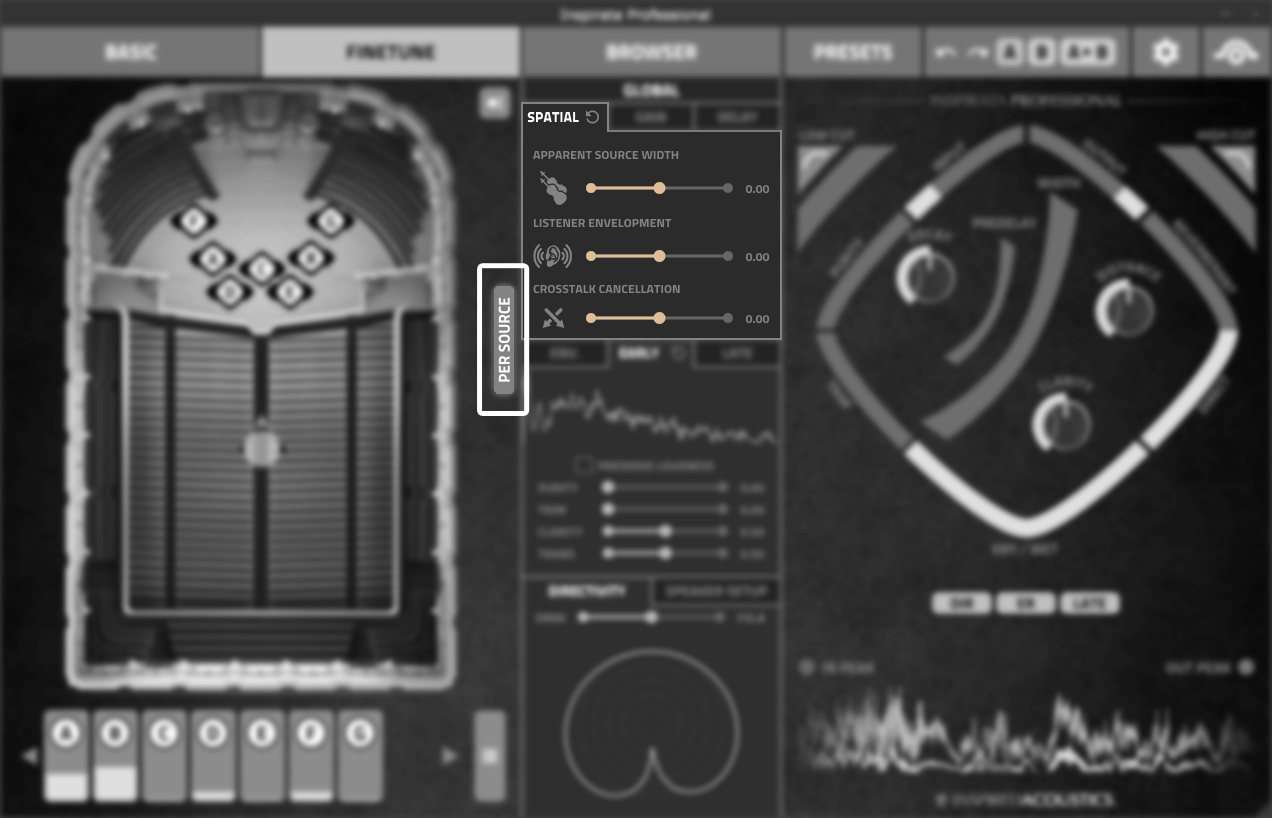
When you click on the Per Source button, you have access to control the ASW (Apparent Source Width) on a per source basis, rather than adjusting the ASW globally for all sound sources. Using the Per Source button can be very useful when various instruments are located on the same stage within a room.
Gain panel
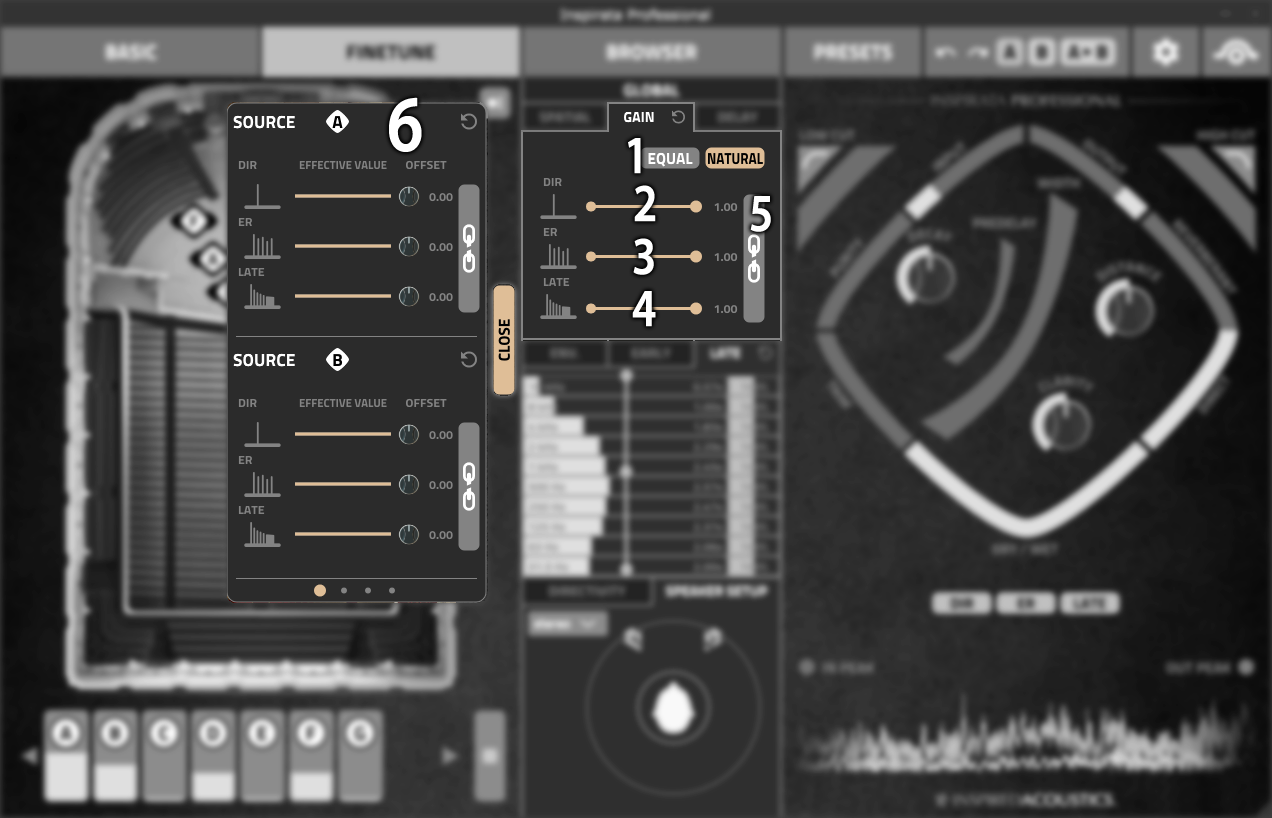
On the GAIN tab, you can adjust the gain of the direct sound, the early reflections and the late reflections separately.
1 Operating mode natural / equal
There are two operating modes to choose from:
-
NATURAL: the changes in gain will follow the true measured pattern, meaning that a sound source farther away from the listener will sound quieter than a source that is closer to the listener.
-
EQUAL: the gain values will be normalized, and there will be no significant gain changes between different source and listener positions.
2 DIR
With this slider, you can adjust the gain of the direct sound.
3 ER
With this slider, you can adjust the gain of the early reflections.
4 Late
With this slider, you can adjust the gain of the late reflections.
5 Linking the sliders
In order to adjust all controls together, you can link the sliders by selecting the chain button.
6 Gain setting per source
You can adjust gain settings globally if you wish to set up the same setting for all the sound sources, or individually, if you wish to have different settings for each sound source. To do the latter option, click on the PER SOURCE button.
Delay panel
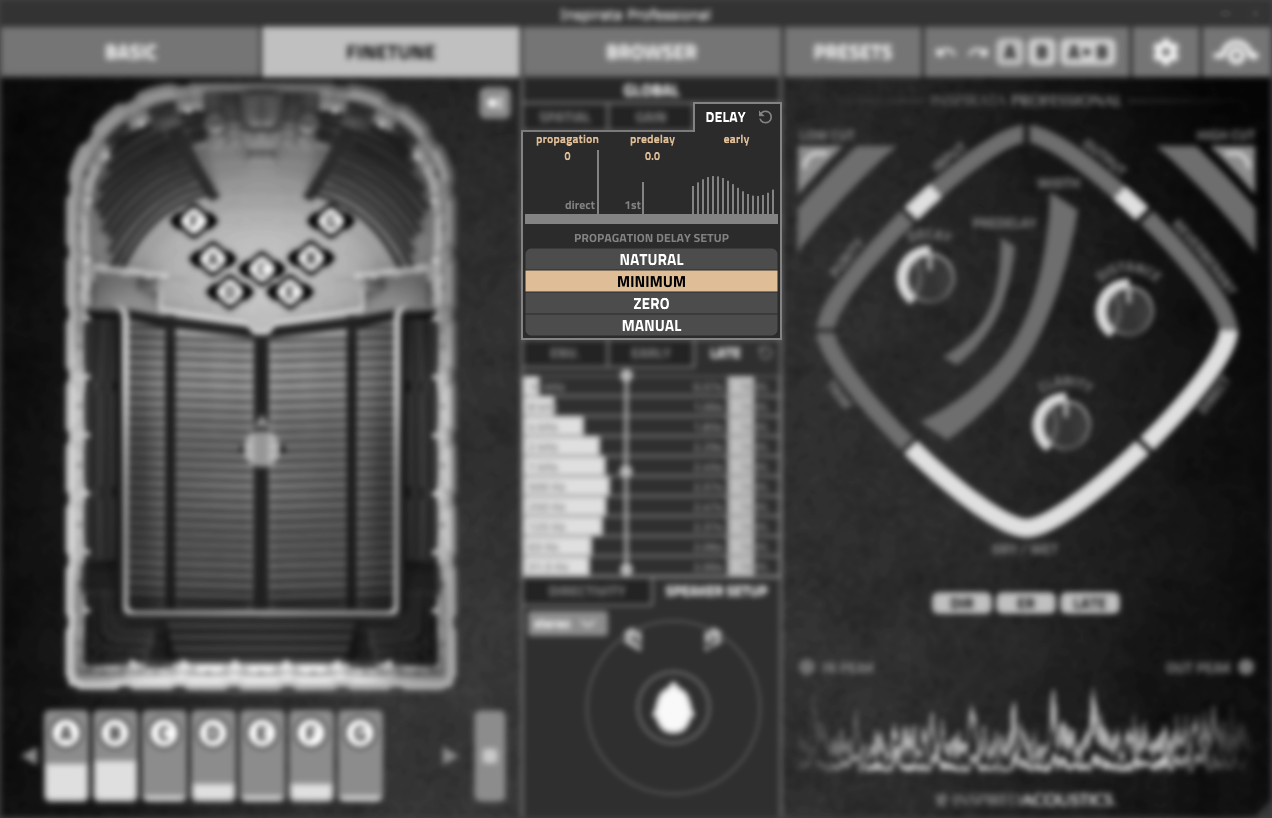
Propagation delay is the time that is needed for the soundwaves to travel from the sound source to the listener. INSPIRATA takes this effect into account. On the DELAY tab you can select from four types of propagation delay modes:
-
NATURAL: keep the original propagation delays
-
MINIMUM: keep the original propagation delay differences between the sources and decrease the propagation delay so that the smallest propagation delay is equal to zero
-
ZERO: set the propagation delay to zero for all sources equally
-
MANUAL: set the propagation delay manually to any desired value
To get the most realistic sound out of Inspirata try to choose the NATURAL or the MINIMUM delay preset. These presets will preserve the depth of the arrangement because they take into account the different distances between the sources and the listener. To hear depth that is exactly what you need, sources that are closer and ones that are farther away from the listening position.
Envelope panel
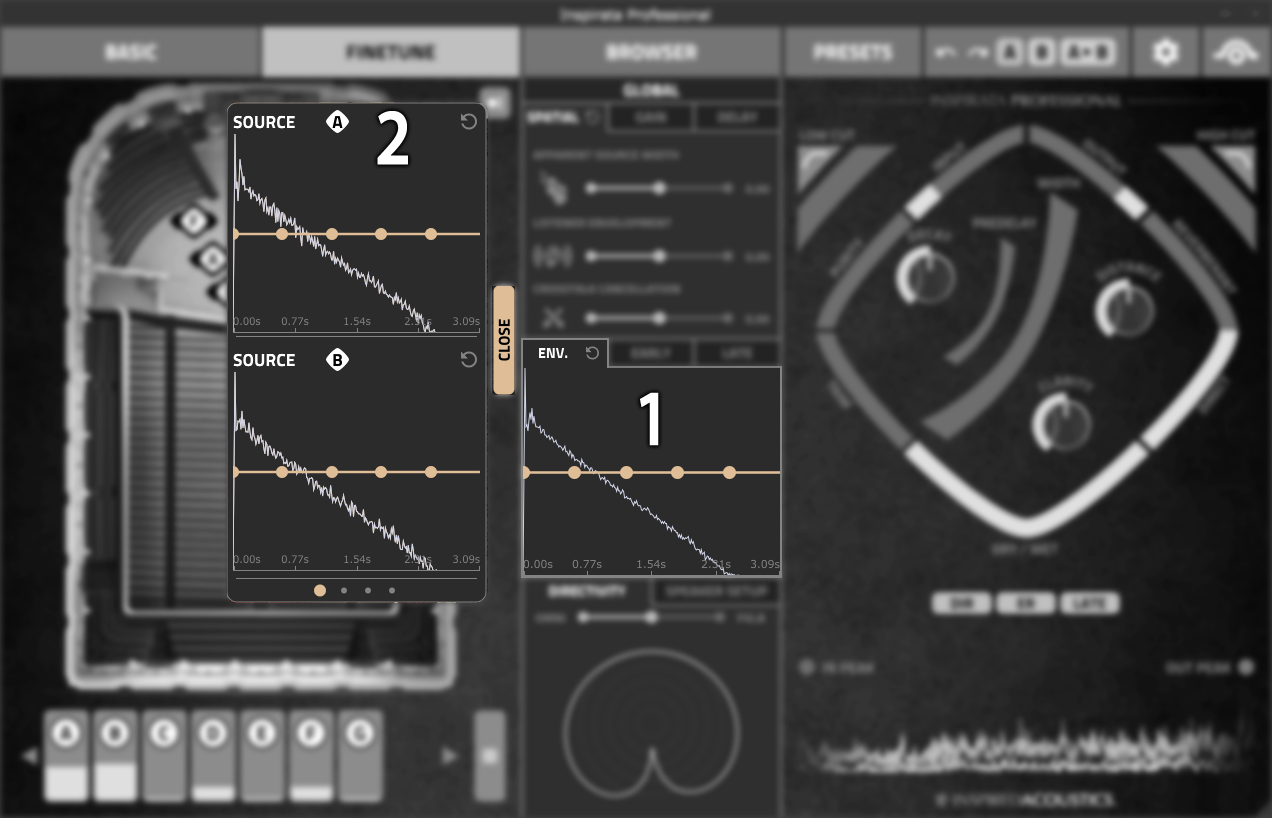
1 Global envelope setting
ENV panel stands for Envelope. This tool allows you to modify the selected room’s decay curve by increasing or decreasing the decay amplitude in time. X axis is time and Y axis is amplitude. Double clicking on a marker will reset its position.
2 Per source envelope setting
The global Envelope settings adjust the decay curve for all the sound sources together. You can set up different envelopes for different sound sources using the Per source envelope settings. Clicking on the “PER SOURCE” button on the left side of the global ENV panel will open the per source ENV panel, where you can adjust the envelope for each sound source individually. If you have more than two sound sources, you can click the dots on the bottom of this subpage and that will display the other sources.
Early panel
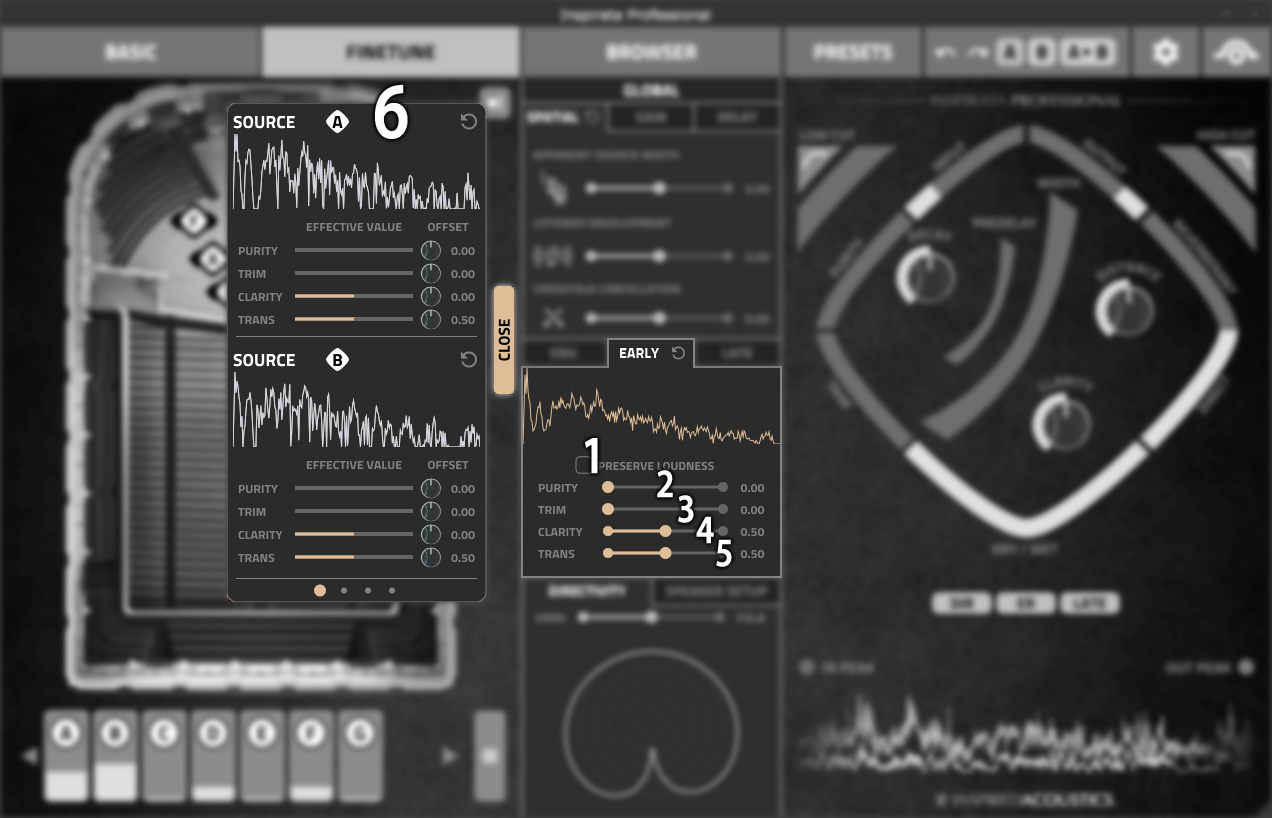
1 Preserve loudness
Adjusting acoustic parameters on the EARLY tab may alter the perceived loudness of the signal, (e.g. increasing CLARITY will often increase the loudness as well). Enabling the PRESERVE LOUDNESS function will compensate for this effect and keep the loudness relatively constant.
2 Purity
Adjusting PURITY, you can add high frequency energy to the perceived early reflections in the room.
3 Trim
Increasing the TRIM slider will gradually erase perceived early reflections in the listening position. This decreases energy in the early section and can result in a similar effect as adding predelay to the signal path.
4 Clarity
With the CLARITY slider you can adjust sound clarity (C80) in the listening position independently from reverberation time. Increasing C80 increases the number and energy of the perceived early reflections one-by-one as if sound reflectors were placed in the room to enhance early reflection propagating from the sources to the listener. Decreasing clarity decreases the number and energy of the perceived early reflections.
5 Trans
This slider sets the length of the time window on which the CLARITY slider has effect. Increasing the transition value lengthens the section on which CLARITY has effect and decreasing the transition shortens that time period.
6 Early settings per source
You can adjust PURITY, TRIM, CLARITY and TRANS globally if you wish to set up the same settings for all the sound sources, or individually, if you wish to have different settings for each sound source. To do the latter option, click on the PER SOURCE button and adjust the settings for a given sound source.
Late panel
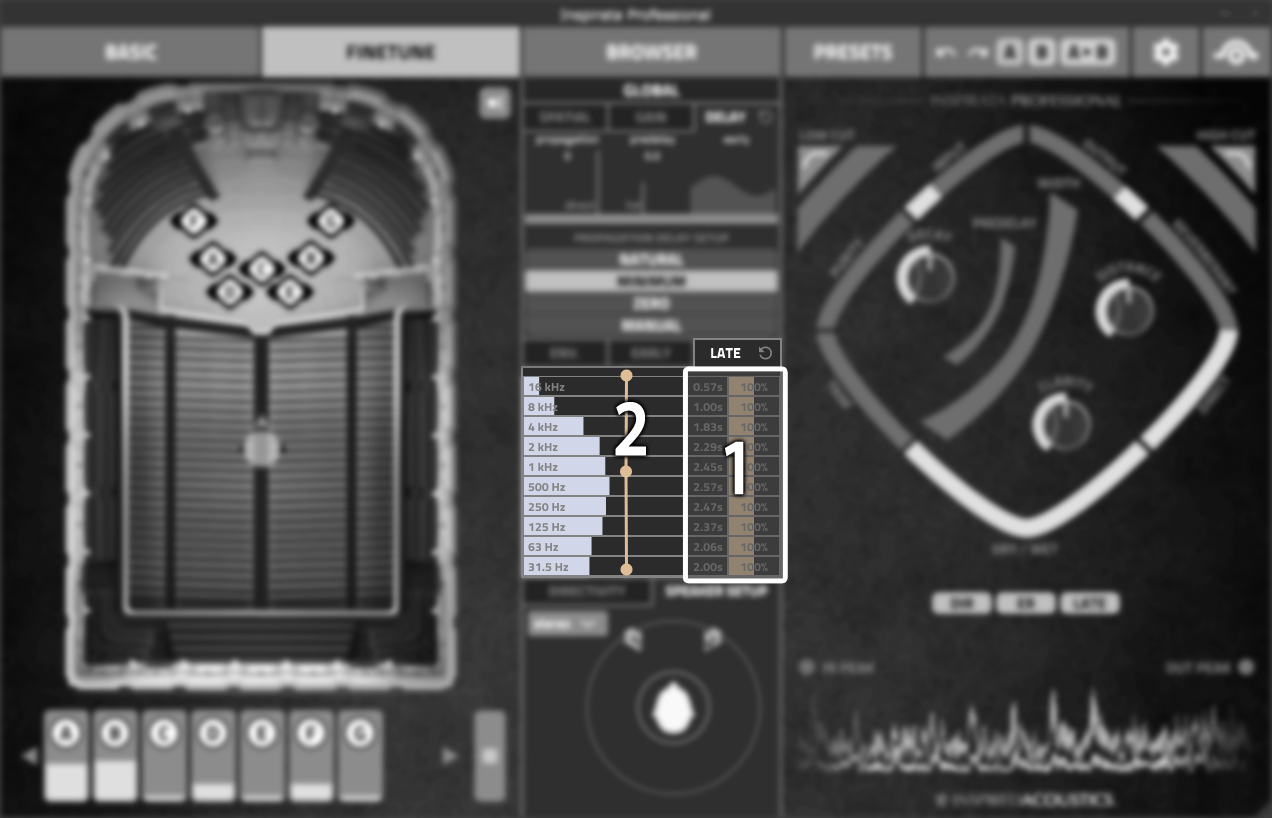
1 Octave-band reverberation time
The LATE panel is an octave-band decay time modifier tool. You can adjust reverberation times of the given octave-bands separately by clicking and dragging the right-hand side drawbars or by clicking and typing in a specific value between 50% and 200%. 50% means a decrease of the reverberation time by half and 200 means the doubling of the reverberation time. By clicking and dragging the center point of the vertical line across the octave-band bars you can adjust all octave-band values jointly.
2 Bass ratio / Treble ratio
By clicking and dragging the upper or lower end of the vertical line across the octave-band bars you can adjust bass ratio and treble ratio in a tilt-like manner. Dragging the upper marker to the right for example increases reverberation time over high frequencies (increases treble ratio) and decreases over low frequencies (decreases bass ratio).
Directivity panel
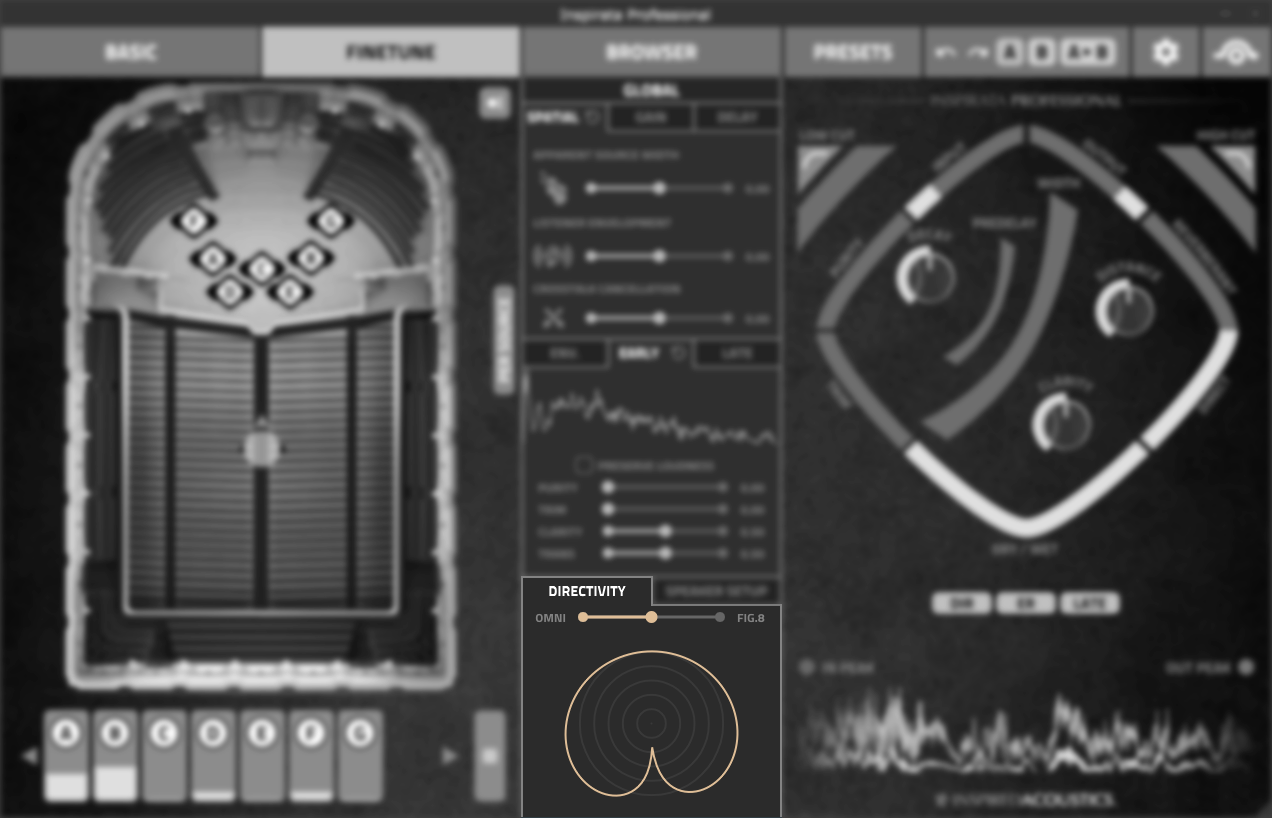
On the DIRECTIVITY panel you can change the virtual microphone’s directional characteristics to anything between omni, cardioid, and figure eight. The selected directional characteristics appear in real time on the diagram below the slider.
Speaker setup panel
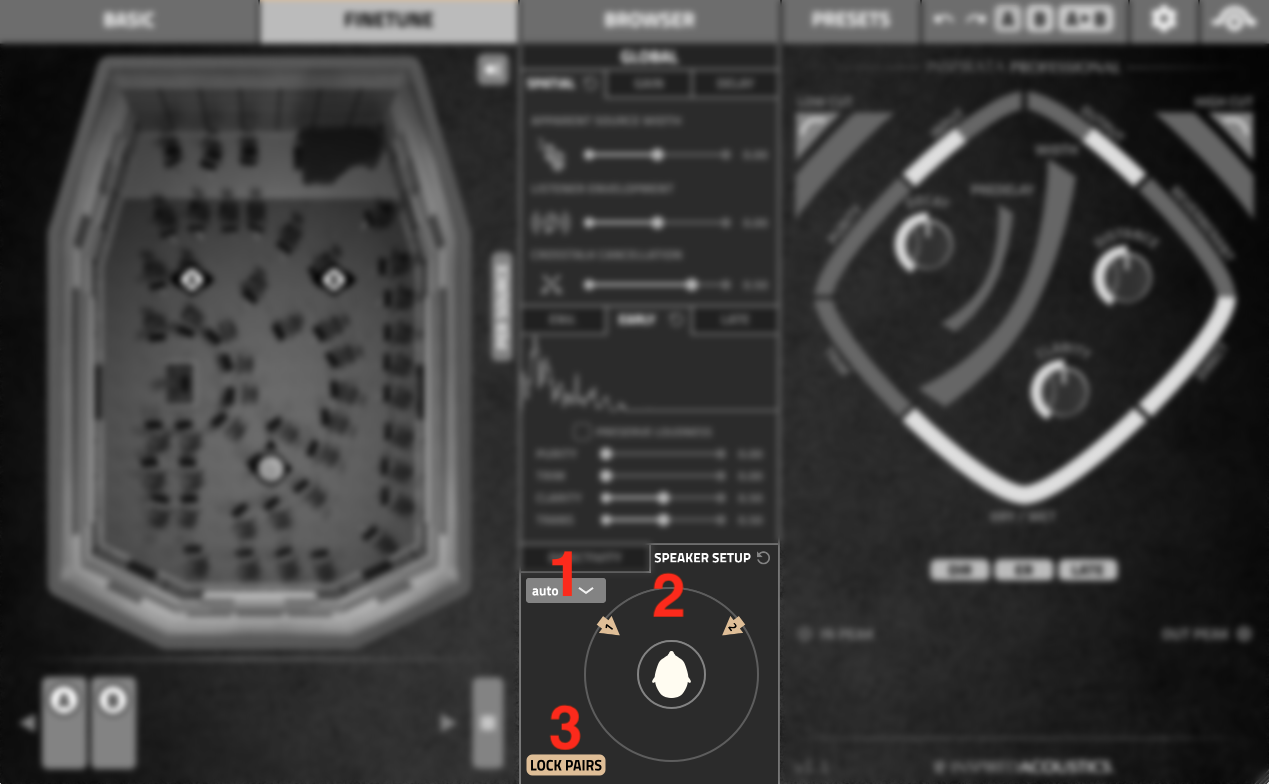
1 Standard speaker options
You can choose various speaker setup options in the SPEAKER SETUP panel. This setting defines the number of the plugin’s output channels. The standard speaker setup options are the following:
- Inspirata Lite Edition: Mono, Stereo
- Inspirata Personal Edition: Mono, Stereo
- Inspirata Professional Edition: Mono, Stereo, LCR, 4.0, 5.0, 5.1, 7.0, 7.1, 7.0.2, 7.1.2, 8.0
- Inspirata Immersive Edition: Mono, Stereo, LCR, 4.0, 5.0, 5.1, 7.0, 7.1, 7.0.2, 7.1.2, 8.0, 22.2
2 Modify speaker setup
You can modify the speaker setup options by moving around the speaker pairs.
3 Lock speaker pairs
With the LOCK PAIRS button active, certain pairs of speakers are locked together so that you can more easily move and position them.
Information
Last updated: 28 March 2022
Applies to